How to Use Raha
PDF Editor
Opened the editor, looked at the row of icons, and had no idea where to click first? This guide is for exactly that moment. We'll go through the screen the way you'd actually see it, with a real screenshot for every step, so nothing is left to guess.
To use Raha PDF Editor, open it in your browser and drop a PDF into the upload box, or click Browse PDF to pick a file from your device. Once it loads, click a tool from the toolbar above the page, click on the document to use it, and click the green Export button when you're done. That's the whole process. If any of those steps aren't obvious yet, that's exactly what the rest of this guide walks through, one screen at a time.
Just want to jump in?
Open Raha PDF Editor now and drop in a PDF. Come back here any time you're not sure what a button does.
Open PDF EditorStep 1: Upload a PDF
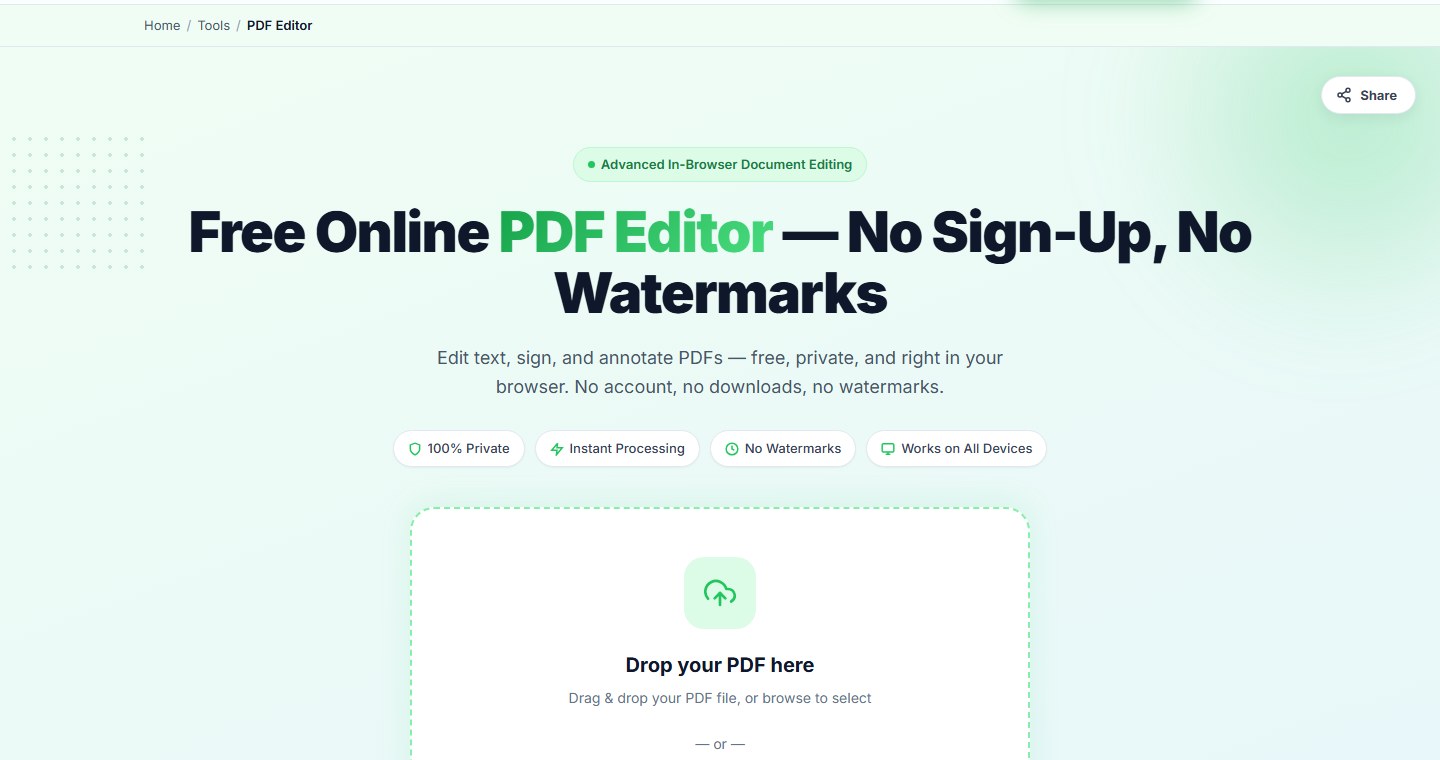
The first screen you see asks for a file before anything else happens. You have two ways to hand one over: drag the PDF from a folder on your computer straight onto the box that says "Drop your PDF here," or click the green Browse PDF button and pick it from the file window that opens, the same one you'd see attaching a file to an email.
Either way, the file is read on your own device. Nothing is sent to a server, which is why it works even on a slow connection and why it's a reasonable place to open something private.
Step 2: Get Your Bearings on the Editor Screen
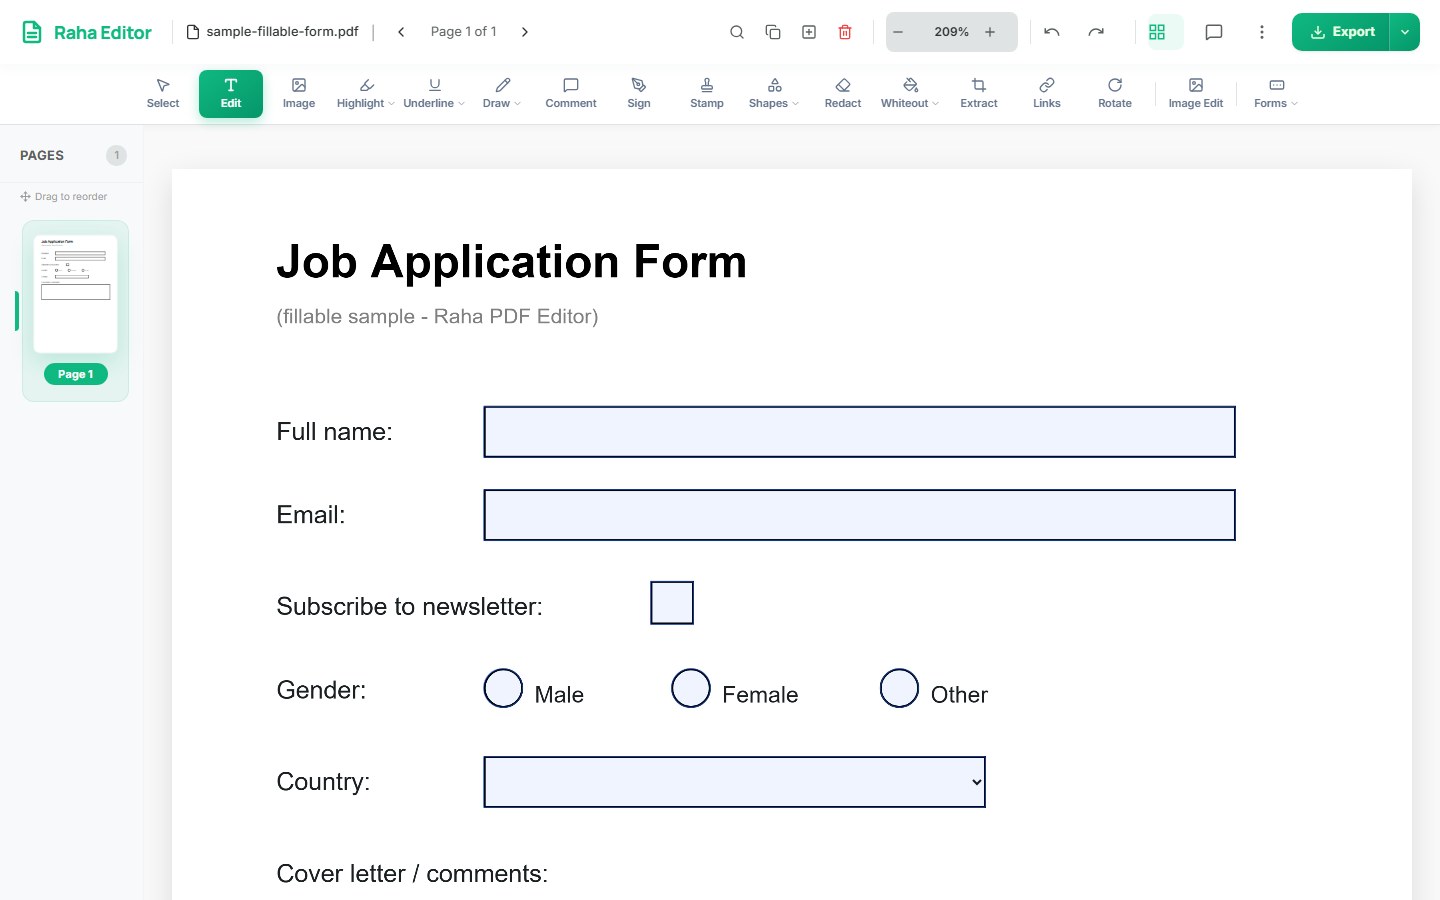
Once your file loads, the screen breaks down into four areas worth knowing before you touch anything. Across the very top sits a thin bar with the file name, page number, zoom, undo and redo, and the Export button. Just below it is a row of tool icons, Select, Edit, Image, Highlight, and so on, which is where you choose what kind of change to make. On the left is a narrow column of page thumbnails. And in the middle, taking up most of the screen, is the page itself, where you actually click to place your edits.
Step 3: The Top Bar, Left to Right
The file name and current page sit on the left. Next to that are the page navigation arrows, then a magnifying glass for Find and Replace, which searches your whole document for a word and can swap it everywhere at once. After that come three page icons: duplicate the current page, insert a blank one after it, and delete it (with a confirmation, and Ctrl+Z always brings it back).
The middle of the bar holds zoom controls, which only change how big the page looks on your screen, and undo and redo, for stepping backward or forward through your recent changes. Toward the right, the grid icon shows or hides the page sidebar, the speech bubble opens a panel for any comments you've added, and the three dots open a small menu for opening a different file, running OCR on a scanned document, comparing two PDFs, or adding Bates numbering. The green button on the far right is Export, which we'll come back to.

Step 4: How to Use Every Tool in the Row
Below the top bar is the row that does most of the actual work. Only one tool is active at a time, and clicking it switches your cursor into that mode. Select, the first icon, doesn't do anything on its own; it's what you click back to afterward, so you can click something you've already placed, a signature, a shape, a comment, and drag, resize, or delete it. Here's exactly how to use everything after it.

How to Edit Text in a PDF
This is the tool most people are here for, and it's the simplest one in the whole row.
- Click Edit in the tool row.
- Click directly on any line of existing text in the document. A cursor appears right inside it, exactly like clicking into a text box.
- Type to add, change, or delete words. A small floating toolbar appears above the text with bold, italic, underline, font size, font family, and text color.
- Click the green checkmark on that floating toolbar, or click anywhere else on the page, to confirm the edit.
Because the editor reads the real font already used in your document, whatever you type matches the surrounding text instead of looking pasted on top of it.

How to Highlight Text in a PDF (Mark It Up)
Use this when you want a line to stand out, the same idea as running a highlighter pen over a printed page.
- Click Highlight. A small color menu opens automatically.
- Pick a color, yellow, green, blue, pink, orange, grey, or your own custom color, or just close the menu to use whatever color was picked last.
- Click and drag across the line of text you want marked, then let go.
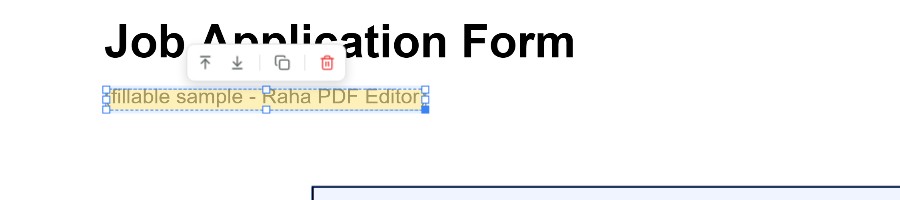
The highlighted line stays selected right after you create it, with small handles you can drag to adjust its size, and a delete icon if you want to remove it.
How to Underline Text in a PDF
Underline works exactly like Highlight, just drawn as a line under the text instead of a color band over it.
- Click Underline and pick a color from the menu that opens (red, yellow, blue, green, black, purple, or custom).
- Click and drag under the line of text you want underlined.

How to Draw or Write by Hand on a PDF
Click Draw to get a freehand pen you control with a mouse, a finger, or a stylus. The small arrow next to the button opens a short list of pen styles, a fine pen and a marker among them, along with a color picker. Pick one and drag anywhere on the page to write a note or circle something. It behaves the same way whether you're marking up a paragraph or scribbling in the margin.
How to Add a Comment
Click Comment, then click anywhere on the page. A sticky-note style marker drops at that spot, and whatever you type into it shows up in the Comments panel, opened from the speech-bubble icon in the top bar. Useful for leaving a note for someone else reviewing the same document, without changing the document text itself.
How to Insert an Image or Logo
Click Image, then click the spot on the page where it should go. You'll be asked to choose a photo or logo file from your device, and it drops in at that position. Switch to Select afterward to drag it into place or resize it by its corner.
How to Sign a PDF
- Click Sign in the tool row.
- Click the spot on the page where your signature should go.
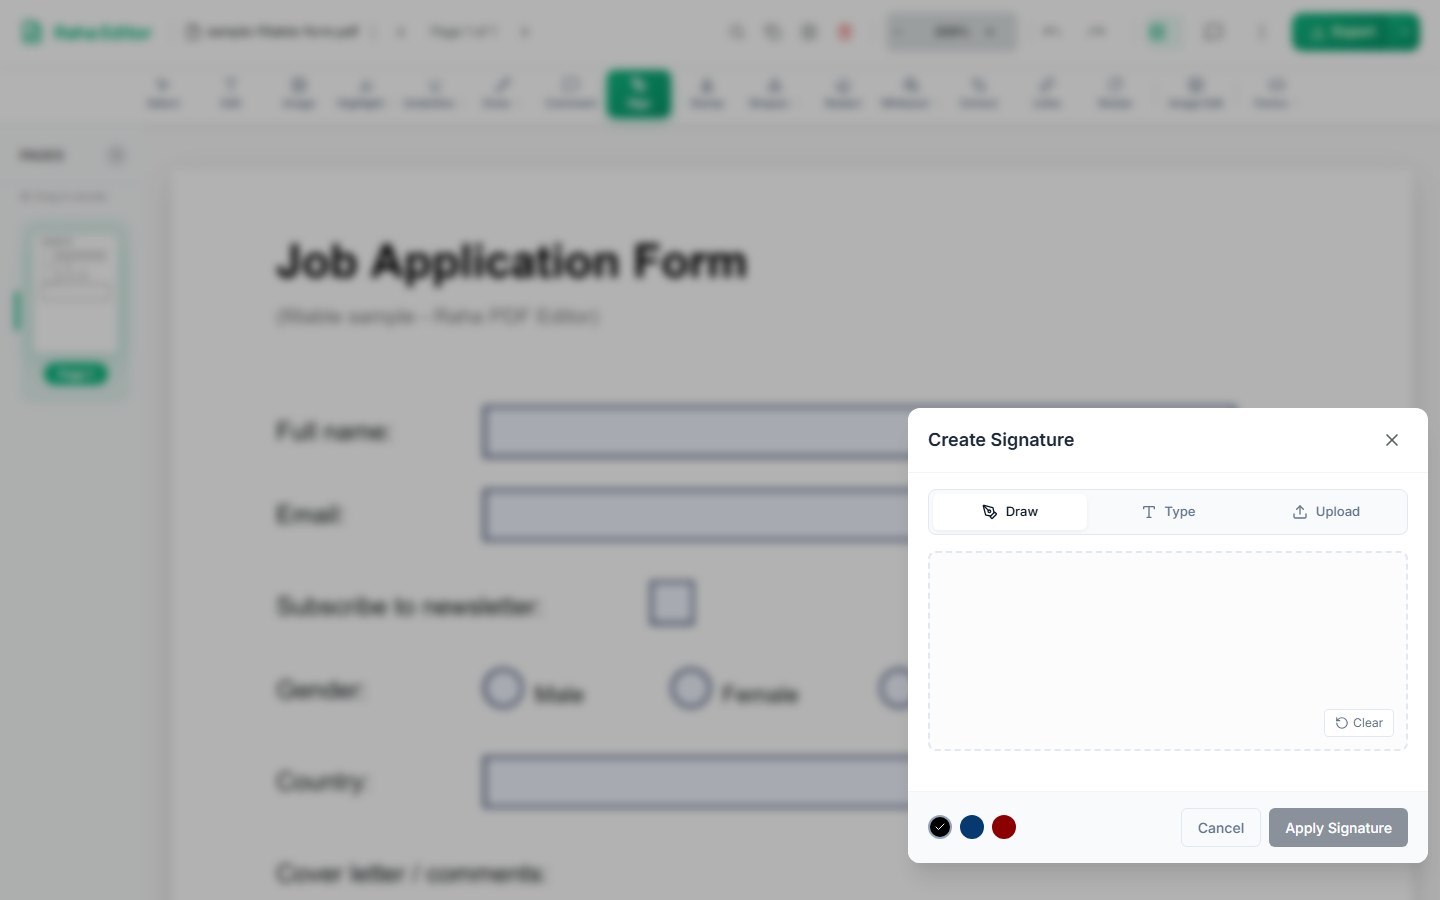
- In the window that opens, pick a tab: Draw it with your mouse or finger, Type your name to render it in a handwriting-style font, or Upload a photo of a signature you've already signed on paper.
- Click Apply Signature.
Drag its corner afterward if it needs resizing.
How to Add a Stamp
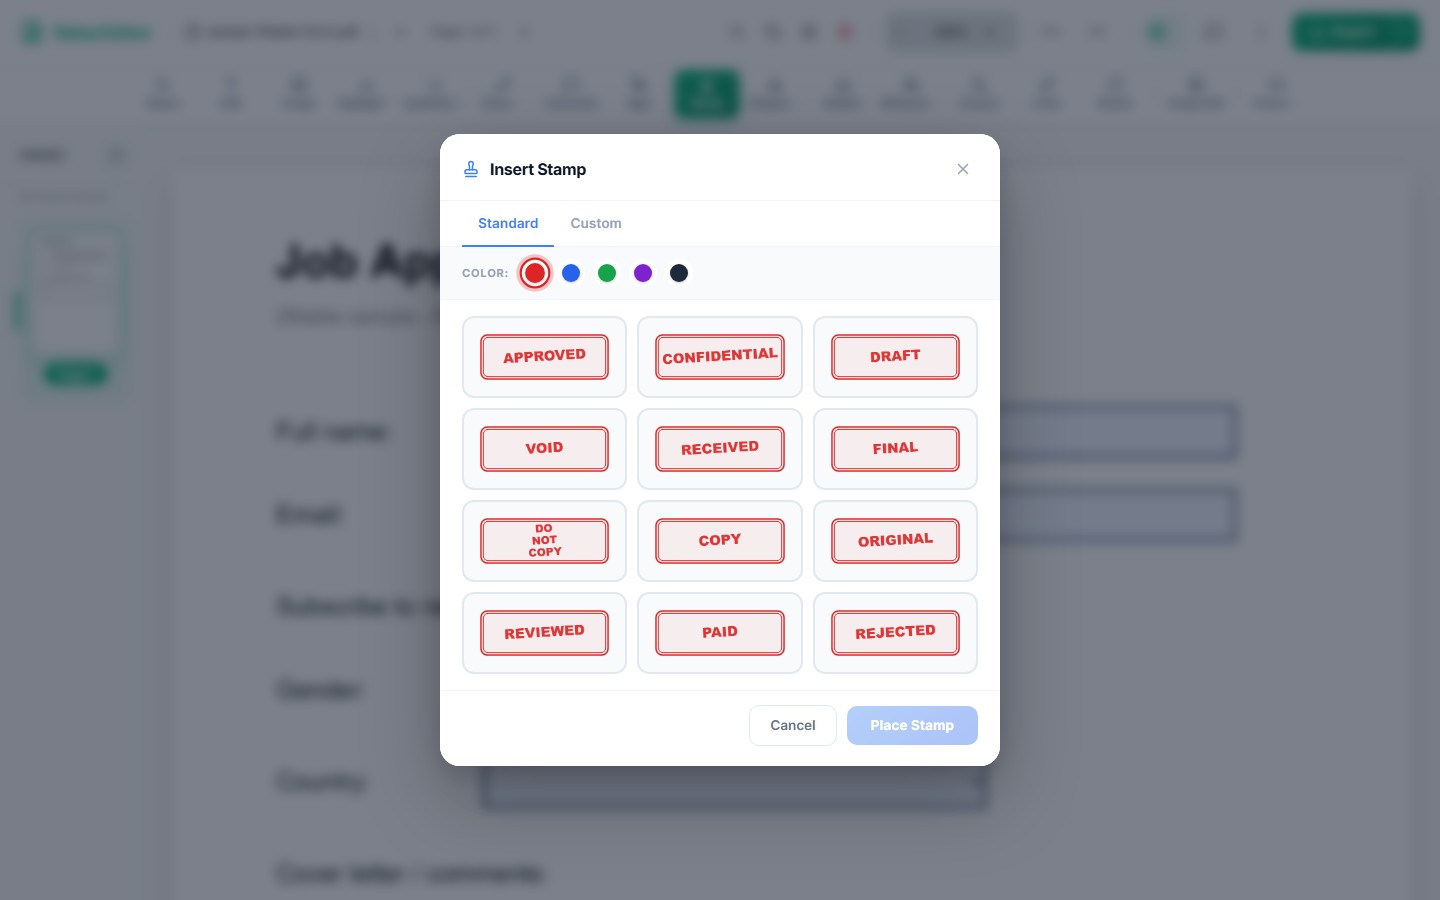
Click Stamp, then click a spot on the page. A gallery opens with ready-made stamps, Approved, Confidential, Draft, Void, Received, Final, and more, in a choice of colors. Pick one and click Place Stamp, or switch to the Custom tab to type your own stamp text and choose a rectangle or circle shape instead.
How to Insert Shapes
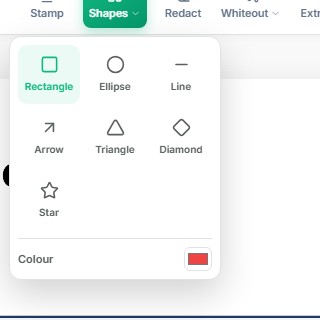
Click Shapes and a small grid opens with a rectangle, ellipse, line, arrow, triangle, diamond, and star, plus a color swatch at the bottom. Pick a shape and a color, then drag on the page to draw it at whatever size you need.
How to Redact (Permanently Remove) Content
Use this when something needs to disappear for good, an account number, an ID number, anything genuinely confidential.
- Click Redact.
- Drag a box over the content you want gone.
The area turns into a solid black box marked "REDACTED." When you export, that page is flattened into an image, so the text underneath is actually gone, not just covered, and can't be recovered by anyone who opens the file afterward.

How to Whiteout Content (and Why That's Different From Redact)
Whiteout looks like it does the same job as Redact, and this is worth being careful about. Click Whiteout, pick a cover color from the menu, white, cream, light grey, legal yellow, light blue, black, or custom, then drag a box over what you want covered. The difference is what happens underneath: Whiteout only paints a color-matched box on top for looks, and the original text is technically still sitting in the file. Redact, above, actually deletes it.
Use Whiteout for cosmetic cover-ups, like hiding an old logo before dropping in a new one. Use Redact for anything you actually don't want someone else to see. Mixing the two up is one of the more common mistakes people make on their first visit.
How to Extract an Image or Chart
Some charts, graphs, or embedded images in a PDF can't normally be clicked or moved on their own. Click Extract, then drag a box around one, and it gets pulled out as its own separate, movable image you can reposition or resize with the Select tool.
How to Add a Clickable Link
Click Links, then drag over a piece of text to turn it into a clickable link pointing to a web address you specify.
How to Rotate a Page
Click Rotate and the page you're currently viewing turns 90 degrees clockwise. Click it again if it needs to keep turning.
How to Edit Existing Images
Image Edit is a toggle, not a click-and-drag tool. Turn it on, and any image that was already part of the original PDF (not one you just added) becomes clickable, so you can drag it to a new position or resize it the same way you would a photo you inserted yourself.
How to Add Fillable Form Fields
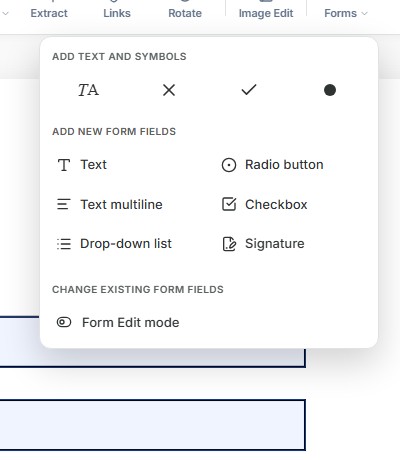
Click Forms to open a menu split into three parts. The top section lets you drop a quick "A" for added text, a cross mark, a check mark, or a dot straight onto the page, handy for filling in a checklist by hand. The middle section builds real fillable fields: a text box, a radio button, a multi-line text area, a checkbox, a drop-down list, or a signature field, click one, then click the page to place it. The bottom section has a Form Edit mode toggle for going back and adjusting fields you've already placed.
Step 5: Managing Pages
The narrow column on the left shows a small preview of every page. Click one to jump straight to it. If the order needs changing, click and hold a thumbnail, drag it up or down, and let go.

Step 6: Saving (Exporting) Your Work
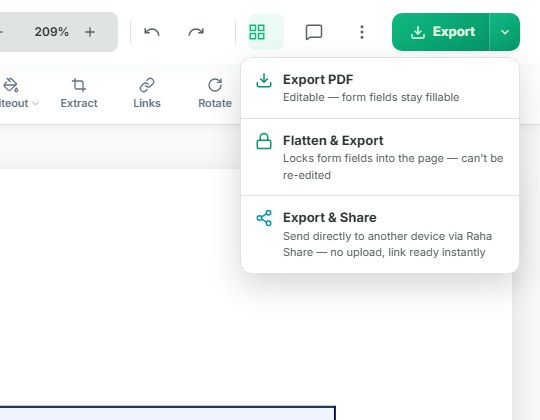
Nothing gets saved on its own. Click the small arrow next to the green Export button and you'll see three choices: Export PDF, the standard option, keeps any form fields you built fillable. Flatten & Export locks those fields permanently into the page so they display correctly everywhere but can't be edited again. Export & Share skips the download and sends the finished file straight to a private transfer link.
Most of the time, the plain Export button, not the little arrow, is all you need. One click, and the finished PDF lands in your downloads folder like anything else from the internet.
A Couple of Extra Tools, for When You Need Them
If your PDF is really just a scanned photo of a paper document, clicking with the Edit tool won't do anything, since there's no real text there yet. Open the three-dot More tools menu and choose Make text editable, and the editor adds a hidden, selectable text layer under the scan so Edit starts working normally.
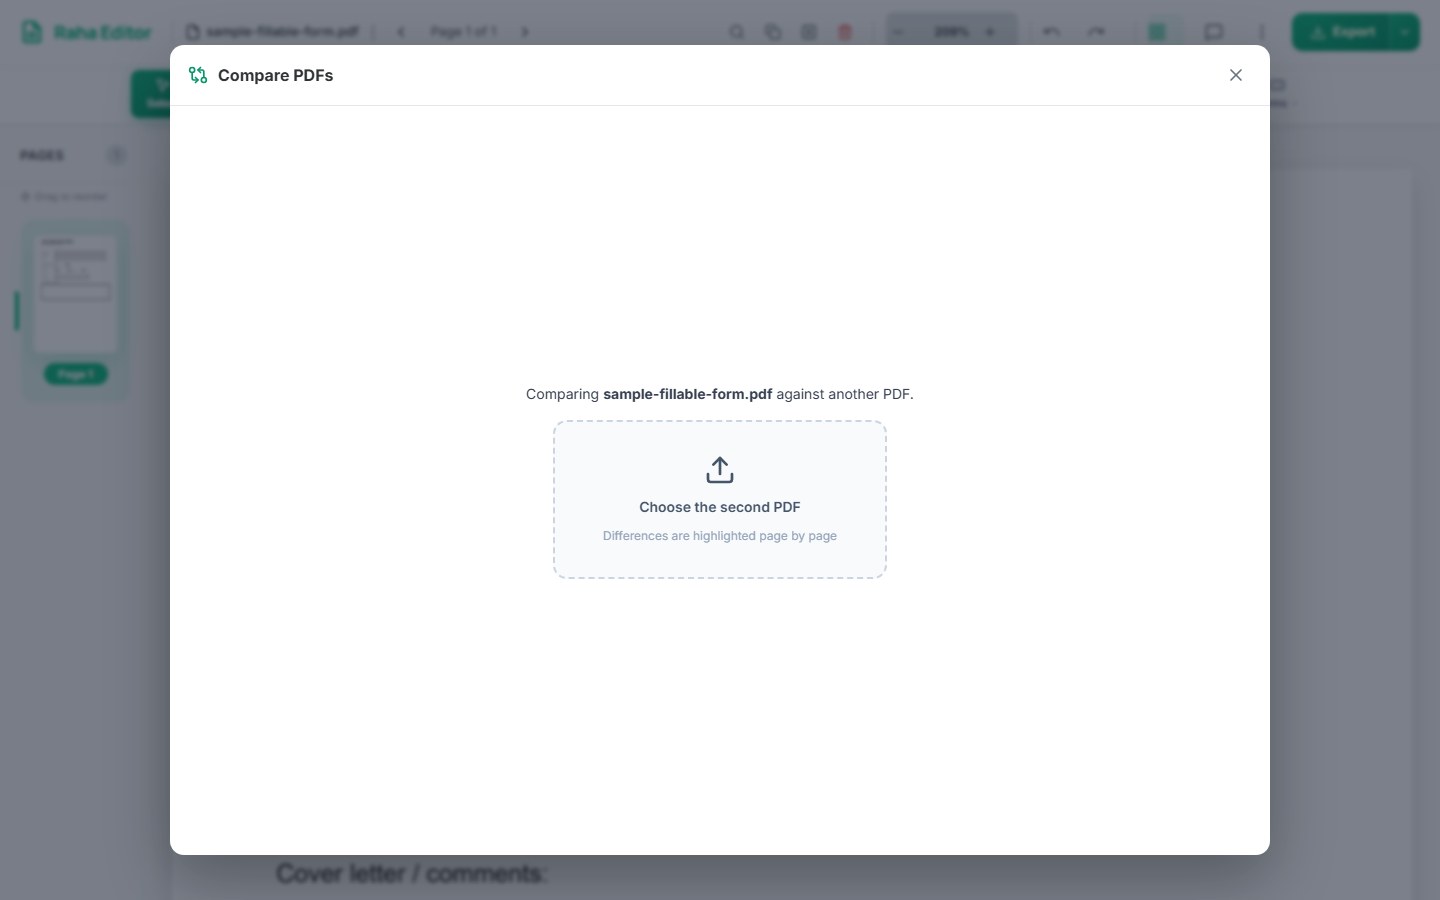
The same menu has Compare PDFs, which lines up two versions of a document and highlights what changed between them, useful for checking a revised contract or a re-exported file without reading the whole thing by eye.
Using It on Your Phone
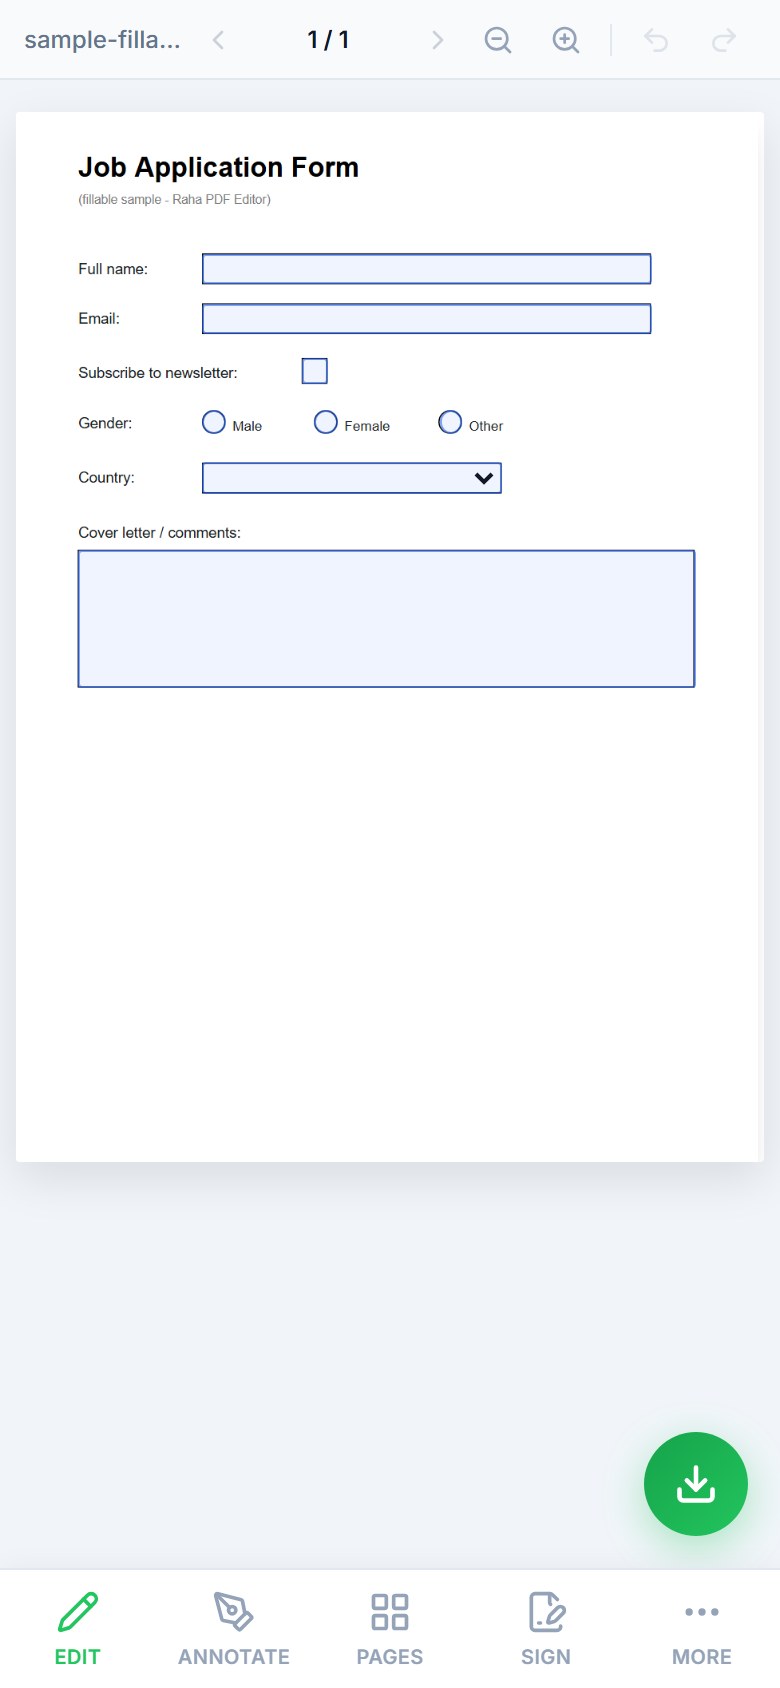
Everything above also works on a phone. Open Safari on an iPhone or Chrome on Android, load the Raha PDF Editor page, and upload your file the same way. The layout rearranges itself into a simpler bottom bar built for a touch screen, with tabs for Edit, Annotate, Pages, Sign, and More. There's no app to find or install.
Frequently Asked Questions
How do I use Raha PDF Editor for the first time?
Open the Raha PDF Editor page and drop your PDF into the upload box, or click Browse PDF to select it. Click a tool in the toolbar, click on the page to use it, then click Export to download the result. No account or installation is needed.
Is Raha PDF Editor free?
Yes. It's free to use, with no watermark on your downloaded file. Free use covers a set number of tasks per hour; a paid plan removes that limit for people who need it.
Do I need to make an account?
No. You open the page and start editing right away. There's no sign-up form and no password.
Is it safe to edit private documents in Raha PDF Editor?
Yes. Your file is opened and edited inside your own browser and is never uploaded to a server, which is why it's a reasonable choice for a lease, a form, or anything else you'd rather keep off someone else's server.
How do I edit text in a PDF?
Click Edit in the tool row, then click directly on any line of existing text. A cursor appears inside it and a small floating toolbar opens above it for bold, italic, underline, font size, font family, and color. Type your change, then click the green checkmark or click elsewhere to confirm.
How do I highlight or underline text in a PDF?
Click Highlight or Underline in the tool row, pick a color from the menu that opens, then click and drag across (or under) the line of text you want marked.
What's the difference between Whiteout and Redact?
Whiteout paints a matching color box over something for looks, but the original text is still in the file underneath it. Redact actually removes the content and flattens that page into an image when you export, so nothing can be recovered. Use Redact for anything genuinely sensitive.
Can I use Raha PDF Editor on my phone?
Yes. It works in Safari on an iPhone and Chrome on Android, with a simplified bottom toolbar built for a touch screen. No app needs to be installed.
Once you're comfortable with the basics, a few related guides go deeper: signing a PDF, redacting one properly, filling out a form, and comparing two versions of the same document.
Ready to Edit Your PDF?
Free, private, and open right in your browser. No account, no watermark.
Open PDF Editor